What’s new in SDK 5
Improvements in SDK 5
- Increased Flexibility: Now supports custom ad sizes, providing more customisation options.
- Enhanced Mobile Experience: All clicks open directly in the app on mobile devices.
- Optimized Performance: SDK 5 is nearly half the compiled size of SDK 4.
- New Payment Callback: Added a payment callback feature, allowing publishers to track estimated revenue through their preferred analytics provider.
To get started with SDK 5, refer to the Quickstart Guide or the Upgrade Guide. You can download SDK in the publisher portal under “Resources” to get an account you simply signup at top right on this site:
Changelog
Changelog for SDK 5 can be found here
Overview
The Adverty SDK is built around a lightweight, engine-agnostic core binary that can be embedded in any rendering runtime. On top of this core we provide first-class engine plugins: Unity is fully production-ready, while Cocos2dx, Godot, and Unreal are currently offered through managed beta programs.
If you would like guidance on selecting the right plugin, need support integrating the core binaries into a proprietary engine, or want to enroll in one of the betas, contact the Adverty team: client-team@adverty.com.
The remainder of this documentation focuses on the Unity plugin, covering setup, configuration, and best practices for launching monetized ad placements in live games.
Plugin distribution
The Adverty Unity plugin can be installed either via the Unity Package Manager (UPM) or by importing a .unitypackage file.
To install the plugin using UPM, use the following Git URL:
git@bitbucket.org:adverty/advertysdk-upm.git
The .unitypackage file can be downloaded from the Adverty admin panel.
Please refer to the Quickstart Guide for step-by-step instructions for both installation methods.
Requirements
- Unity 2022.x or newer
- Android API 24 (Android 7.0) or newer
- iOS 12.0 or newer
- macOS 12.0 or newer
- Windows 10 or newer
General Information
Core Concepts
The Adverty Unity SDK operates inside your game application through an Adverty session. You can control the lifetime of this session, preload advertisements, and subscribe to Adverty callbacks.
SDK Requirements
A key requirement for proper operation is providing a valid game camera. You can assign it manually or use one of the provided example scripts.
Ad placements
The Adverty Unity SDK provides three ad placement types to support different integration scenarios:
- MeshPlacement designed for 3D environments, MeshPlacement allows ads to be rendered on 3D mesh objects in the game world. This placement type is ideal for billboards, in-game screens, or any 3D surface intended to display advertisements.
- UIPlacement is optimized for Unity’s UI system and is suitable for displaying ads within the game interface. It integrates seamlessly with Unity UI components and is commonly used for overlay ads, menu banners, or other 2D UI elements.
- SpritePlacement is intended for 2D games and sprite-based environments. Ads are rendered as sprites, making this placement type ideal for side-scrollers or other 2D game scenarios.
Each placement type can be customized to match your game’s visual style and requirements. Note: The default implementation of UIAdPlacement uses Unity’s UI package (available via the Unity Package Manager). If you use a different UI system, you can modify UIAdPlacement.cs accordingly.
â– NOTE: To start earning revenue, remember to publish your application in the portal at adverty.com to set the application to “Live”. Apps which is not set to live status will fail to sign-in to our service without sandbox enabled.
Setup SDK
Please, refer to the Quickstart Guide to install and perform the initial setup of the Adverty Unity SDK. This section focuses on advanced SDK configuration.
Adverty Unity SDK context
The Adverty context exists for the lifetime of the application. It is created when the application starts and destroyed when the application exits. After importing the Adverty package, you can verify successful initialization by checking the Unity Console logs (press Play in the Unity Editor).
 The Adverty context remains inactive until an Adverty session is started.
Adverty Unity SDK session
An Adverty session manages ad serving. To start a session, you must configure a valid API key (see the Quickstart Guide for details). An active game camera is required for the session to function correctly. You can control the session lifecycle using the following methods:
- AdvertySDK.Init() – starts the session
- AdvertySDK.Terminate() – ends the session
Example
    void Start()
    {
        Adverty5.AdvertySDK.Init();
        Debug.Log("Adverty Initialized: " + Adverty5.AdvertySDK.IsInitialized);
    }

    void OnDestroy()
    {
        Adverty5.AdvertySDK.Terminate();
        Debug.Log("Adverty Initialized: " + Adverty5.AdvertySDK.IsInitialized);
    }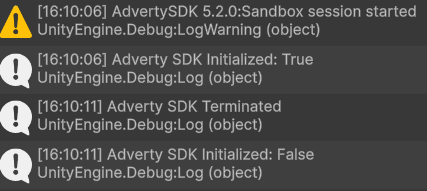
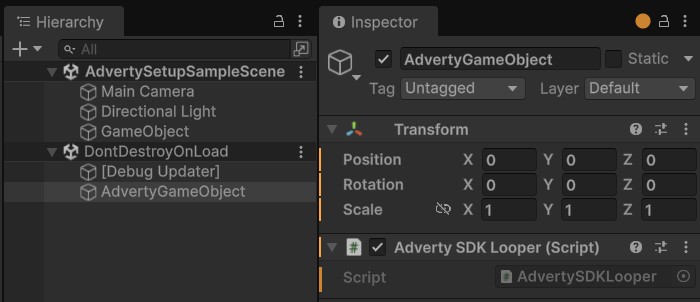
When an Adverty session starts a new AdvertyGameObject with AdvertySDKLooper component is automatically added to the scene. This object is responsible for session updates.
It is recommended to keep the Adverty session alive for the entire application runtime to avoid unnecessary session recreation.
The SDK provides example scripts to manage session lifetime. Add one of these scripts to a GameObject in your scene (it is recommended to use a standalone empty GameObject):
- AdvertySDKSingleSceneExample – keeps the session active for a single scene
- AdvertySDKMultiSceneExample – keeps the session active for the entire application
Game Camera requirements
The Adverty Unity SDK requires an active game camera. To assign the game camera, use: AdvertySDK.SetMainCamera(activeGameCamera);. If the session is initialized before a camera is available, or if the active camera changes at runtime, make sure to update the SDK as soon as the new camera becomes active.
Example
    var gameCamera = Camera.main; // or your specific camera
    Adverty5.AdvertySDK.SetMainCamera(gameCamera);
Ad Placement Setup
An ad placement represents a location where an advertisement can be displayed. The Adverty Unity SDK supports three placement types:
-
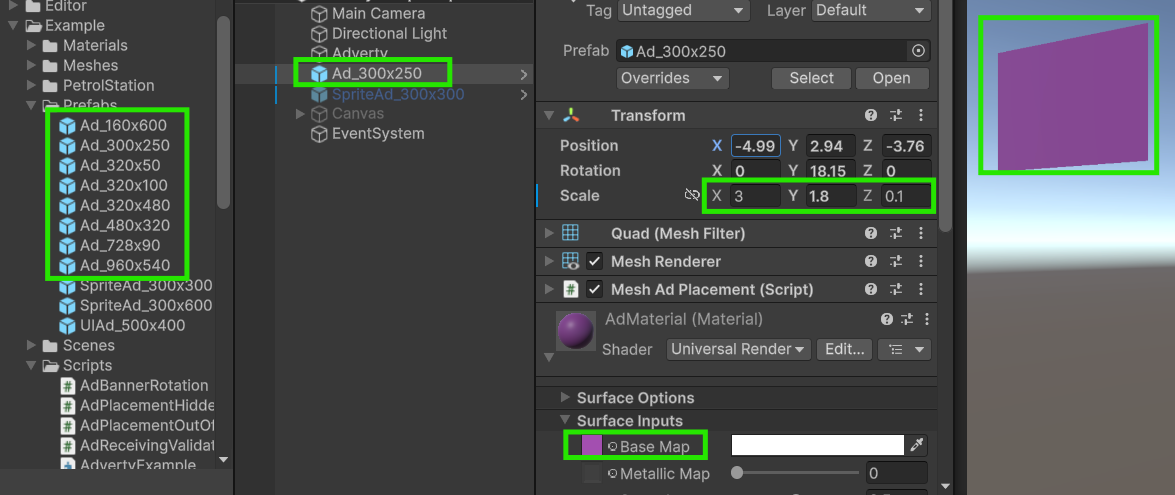
Mesh Ad Placement designed for 3D environments, this placement uses a Unity material and texture to display ad content after activation. Preconfigured mesh placement prefabs are provided in the Examples folder, using common ad aspect ratios. You can freely adjust the placement’s width and height and assign a default texture that will be shown before activation.
-
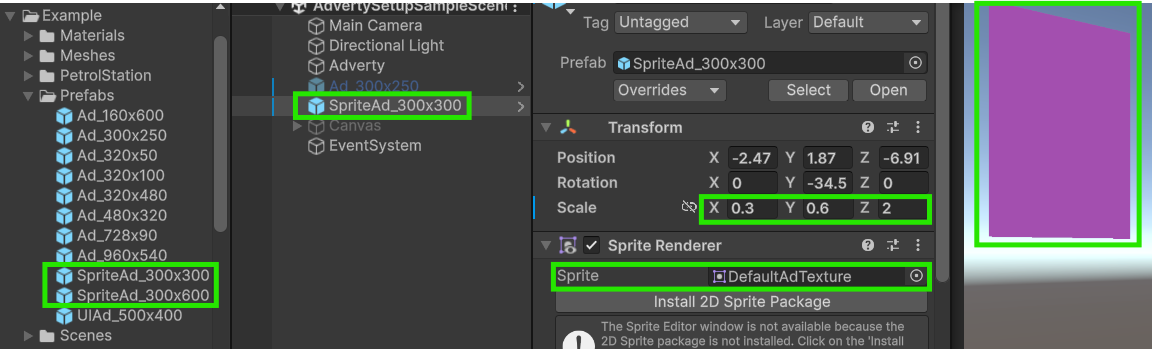
Sprite Ad Placement designed for sprite-based content, this placement uses a SpriteRenderer to display ads. A prepared sprite placement prefab is included in the Examples folder. You can resize it freely and assign a default sprite to be shown before activation.
-
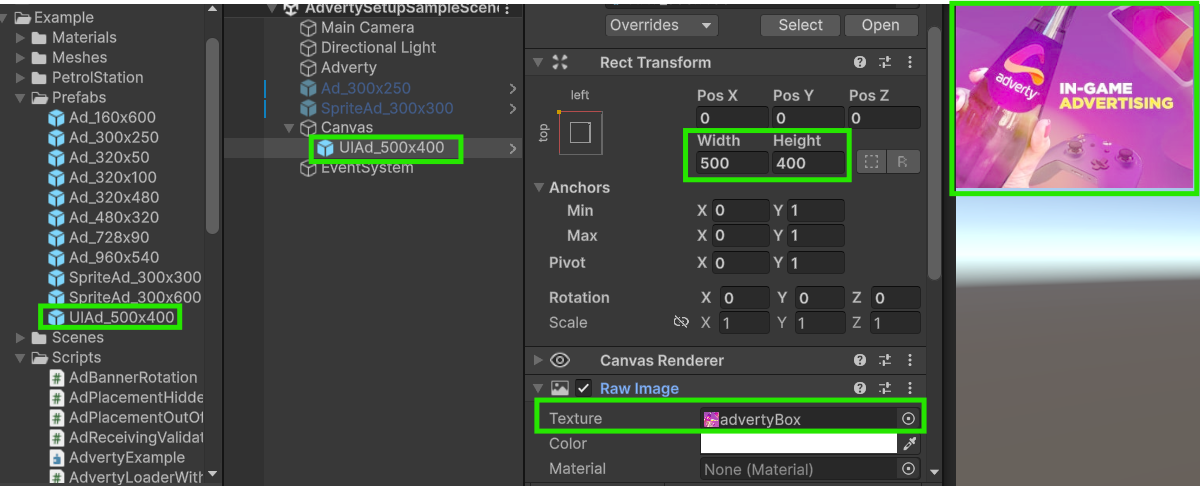
UI Ad Placement designed for Unity’s UI layer, this placement uses a RawImage component to render ads. A ready-to-use UI placement prefab is provided in the Examples folder. Note that this placement must be placed under a Unity Canvas, as it is a UI element. You can configure its size freely and assign a default texture.
You may also use your own GameObjects together with the provided placement scripts, or use the prepared prefabs from the Examples folder.
Testing Ad Placements
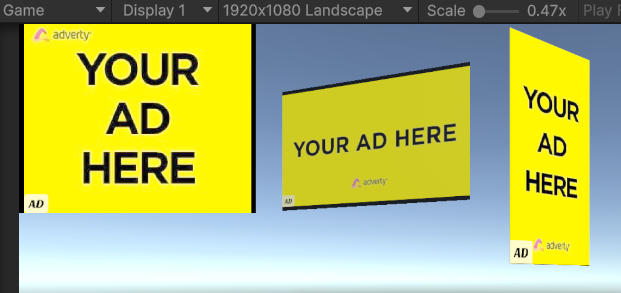
The simplest way to test an ad placement is to run the game with Sandbox Mode enabled (see the Quickstart Guide for instructions). If everything is configured correctly, a yellow placeholder ad with the text “Your Ad Here” will be displayed.
User Data
Adverty allows you to provide optional user data for ad targeting and regulatory compliance. All methods for configuring user data are available on the static AdvertySDK class.
-
SetUserGenderSets the user’s gender.Parameters
- Gender – A value from the Gender enumeration.
-
SetUserYearOfBirthSets the user’s year of birth.Parameters
- int – Year of birth.
-
SetUseCOPPASpecifies whether the user is subject to COPPA regulations.Parameters
- bool – Indicates whether the user falls under COPPA compliance.
-
SetConsentedSets the user consent status used for ad serving and regulatory compliance.Parameters
- bool – Indicates whether the user has granted consent for advertising-related data processing.
-
SetConsentStringSets the GDPR consent string.Parameters
- string – GDPR consent string (TCF format).
-
SetGPPConsentStringSets the GPP consent string used for CCPA and other applicable regulations.Parameters
- string – GPP-driven consent string.
-
SetGPPSidSets the GPP Section ID (GPPSID) array.Parameters
- int[] – Sets the GPP Section ID (GPPSID) array.
-
SetUserDataSets the complete user data structure in a single call.Parameters
- UserData – Fully populated UserData object.
Example
    AdvertySDK.SetUserGender(Gender.Male);
    AdvertySDK.SetUserYearOfBirth(2001);
    AdvertySDK.SetUseCOPPA(true);
    AdvertySDK.SetConsented(true);
    AdvertySDK.SetConsentString("consentString");
    AdvertySDK.SetGPPConsentString("gppConsentString");
    int[] gppsIds = { 1, 2, 3 };
    AdvertySDK.SetGPPSid(gppsIds);
Adverty Events
Adverty provides a set of events that allow publishers to react to various SDK and ad lifecycle changes. These events are divided into two categories:
- Session events: global events that occur during the Adverty session lifetime.
- Ad placement events: events that occur during the lifetime of a specific ad placement.
Example implementations of these events usage can be found in the AdvertyLoaderWithCallbacks and AdReceivingValidation scripts.
Adverty Session Events
Session events are defined in the AdvertySDK static class. An example of their usage can be found in the AdvertyLoaderWithCallbacks script.
-
AdReadyEventCalled when an ad is ready to be displayed.Parameters
- price – price of the ad in USD.
- width – Width of the ad texture in pixels.
- height – Height of the ad texture in pixels.
-
BrowserOpenEventCalled when the browser is opened as a result of user interaction.
-
BrowserCloseEventCalled when the browser is closed.
-
PreviewOpenEventCalled when the ad preview is opened as a result of user interaction.Parameters
- x – X-coordinate (left) of the ad preview on the screen, in pixels.
- y – Y-coordinate (top) of the ad preview on the screen, in pixels.
- width – Width of the ad preview in pixels.
- height – Height of the ad preview in pixels.
-
PreviewCloseEventCalled when the ad preview is closed.
-
AdViewedEventCalled when an ad placement is viewed.Parameters
- placementId – Identifier of the ad placement.
Example
    protected void Start()
    {
        AdvertySDK.SetMainCamera(Camera.main);

        // Subscribe to Session events
        AdvertySDK.BrowserOpenEvent += OnBrowserOpened;
        AdvertySDK.BrowserCloseEvent += OnBrowserClosed;
        AdvertySDK.PreviewOpenEvent += OnPreviewOpened;
        AdvertySDK.PreviewCloseEvent += OnPreviewClosed;
        AdvertySDK.AdReadyEvent += OnAdReady;
        AdvertySDK.AdViewedEvent += OnAdViewed;

        AdvertySDK.Init();
    }

    private static void OnPreviewOpened(int x, int y, int width, int height)
    {
        Debug.Log(string.Format("Preview Opened. Position: {0}, {1}; Size: {2}, {3}",
            x, y, width, height));
    }

    private static void OnPreviewClosed()
    {
        Debug.Log("Preview Closed");
    }

    private static void OnAdViewed(int placementId)
    {
        IEnumerable placements = FindObjectsOfType(false)
            .Where(p => p.Id == placementId);

        if (placements != null)
        {
            Debug.Log("Ad was viewed on placement: " + placements.First().name);
        }
    }

    private static void OnAdReady(double price, int width, int height)
    {
        Debug.Log("AdReady. Ad price: " + price +
            ". Ad Size: width " + width + " height " + height);
    }

    private static void OnBrowserOpened()
    {
        Debug.Log("On browser opened");
    }

    private static void OnBrowserClosed()
    {
        Debug.Log("On browser closed");
    }
Ad Placement Events
Ad placement events are triggered during the lifecycle of a specific ad placement. These events allow you to track placement registration, activation, and ad delivery. They are exposed as events on the AdPlacement class. An example of their usage can be found in the AdReceivingValidation script.
-
AdPlacementRegisteredEventFired when an ad placement is successfully registered in the Adverty Unity SDK.Parameters
- placement – The ad placement instance that was registered.
-
AdPlacementFailedToRegisterEventFired when an ad placement fails to register.Parameters
- placement – The ad placement instance that failed to register.
-
AdPlacementActivatedEventFired when an ad placement receives an ad and becomes active.Parameters
- placement – The ad placement instance that has been activated.
Example
    private AdPlacement targetPlacement;

    protected void Start()
    {
        // assuming targetPlacement has valid reference to MeshAdPlacement,
        // UIAdPlacement or SpriteAdPlacement class
        targetPlacement.AdPlacementRegisteredEvent += OnAdPlacementRegistered;
        targetPlacement.AdPlacementFailedToRegisterEvent
            += OnAdPlacementRegistrationFailed;
        targetPlacement.AdPlacementActivatedEvent += OnAdPlacementActivated;
    }

    private void OnAdPlacementActivated(AdPlacement placement)
    {
        Debug.LogFormat("Ad placement {0} received an ad.", placement.name);
    }

    private void OnAdPlacementRegistrationFailed(AdPlacement placement)
    {
        Debug.LogWarningFormat("Ad placement {0} registration failure.",
            placement.name);
    }

    private void OnAdPlacementRegistered(AdPlacement placement)
    {
        Debug.LogWarningFormat("Ad placement {0} registration success.",
            placement.name);
    }
Ad Preloading
Adverty allows developers to preload ads before ad placements are registered. This is useful when ad placements are created or displayed later in gameplay rather than at application startup, ensuring that ads are already loaded and ready to be shown when needed.
Note: This feature is disabled by default. To enable it, please contact the Adverty team.
To preload ads, create an array of PreloadingAdExtent objects and specify the required ad sizes. Pass this array to AdvertySDK.SetAdPreload.
You can then subscribe to AdvertySDK.AdReadyEvent to receive notifications when each ad becomes ready for display.
For a complete working example, refer to the AdvertyLoaderWithPreloadAds script.
Example
    protected void Start()
    {
        PreloadingAdExtent[] preloadingAds = new PreloadingAdExtent[3];
        preloadingAds[0] = new PreloadingAdExtent { width = 300, height = 250};
        preloadingAds[1] = new PreloadingAdExtent { width = 300, height = 600};
        preloadingAds[2] = new PreloadingAdExtent { width = 800, height = 260};

        AdvertySDK.SetAdPreload(preloadingAds);

        AdvertySDK.SetMainCamera(Camera.main);
        AdvertySDK.Init();
    }
Control Ad Refreshing
Adverty allows you to control whether the SDK is permitted to refresh ads automatically. You can enable or disable ad refreshing using the methods provided by the AdvertySDK class. Ad refreshing is enabled by default.
Methods
AdvertySDK.EnableAdRefresh() – Enables automatic ads refreshing. AdvertySDK.DisableAdRefresh() – Disables automatic ads refreshing.Example
    // Allow ad placements refresh ads
    AdvertySDK.EnableAdRefresh();

    // Don't allow ad placements refresh ads
    AdvertySDK.DisableAdRefresh();
ImpViz™
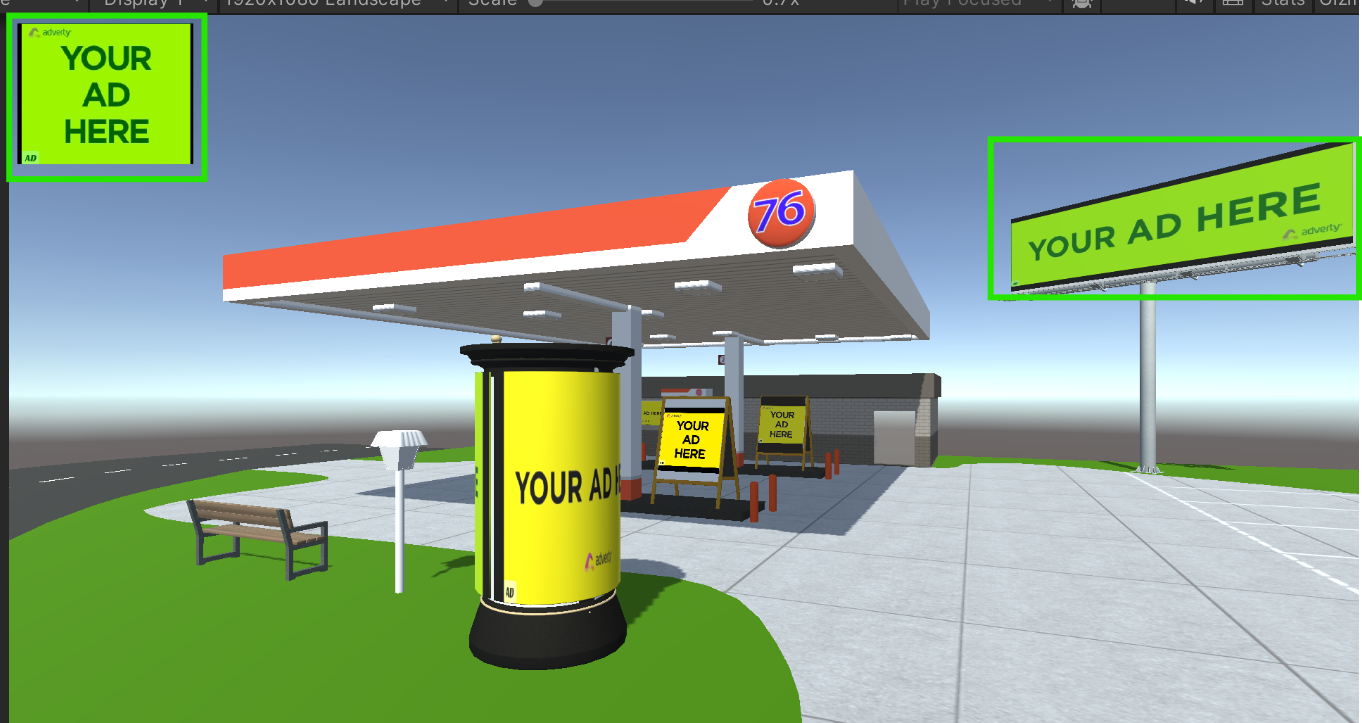
ImpViz™ is a debug tool that visually confirms ad impressions during development. When enabled, any ad placement that registers an impression is overlaid with an animated green tint for approximately 3 seconds, then fades out. This makes it easy to verify that impression tracking is working correctly without reading logs or attaching a debugger.
Note: ImpViz™ is intended for development and testing only. Make sure it is disabled before releasing your game.
Unity
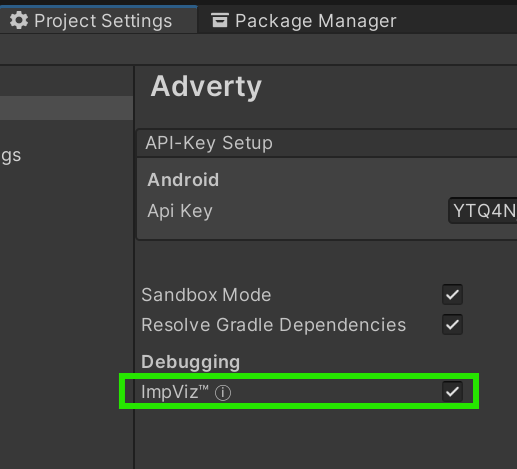
Enable ImpViz™ in the Unity Editor via Edit → Project Settings → Adverty by toggling the ImpViz™ checkbox under the Debugging section.
You can also set it at runtime:
    // Enable ImpViz
    AdvertySettings.EnableImpViz = true;

    // Disable ImpViz
    AdvertySettings.EnableImpViz = false;
The value is read during AdvertySDK.Init() and passed to the SDK as part of the launch configuration.
When active, impressed placements are highlighted with an animated green tint for approximately 3 seconds:
Upgrading from SDK 4.x to SDK 5.x
If you are updating from SDK 4 to SDK 5 we recomend the upgrade guide.